· 10 min read
Migration Guide for Citrix to Azure Virtual Desktop

Overview
In today's environment of "hybrid workfroce", providing capabilities of a secure remote desktop and application access virtually anywhere experience for employees.
I've seen many companies since 2020 look to modernize their Virtual Desktop Infrastructure (VDI) or considering new ways of working by assessing how to bring resilience to an organization.
Why Even Consider Cloud VDI?
Virtual Desktop Infrastructure (VDI) is often used to deliver a "remote desktop experience" to internal and external employees/consultants, and is often delivered through Remote Desktop Services (RDS). However, on-premises RDS solutions does not realize the full benefits and modernization that cloud desktop virtualization enables.
Key Azure Benefits:
By migrating a Citric VDI, one can realize the benefits of modernization, including:
- Improved security posture via built-in/integrated Azure Virtual Desktop security features
- Reduced hardware and infrastructure costs, lowering overall capital expenditure
- Simplified management that allows you to deploy and scale within minutes to meet your business needs
- A seamless experience optimized for Windows 10 and Microsoft 365 apps, including Microsoft Teams
- If Azure Virtual Desktop runs alongside the Citrix Virtual Apps and Desktops service, you take advantage of unified managemet
Migration Overview
We first consider the prerequisites to migrate existing virtual machines (VMs) to Azure as well as those needed for the Citrix Virtual Apps and Desktops service, which extends to Azure Virtual Desktop. This is critical if migrating VDI the Citrix Virtual Apps and Desktops service and Azure Virtual Desktop.
This enables us to connect the Azure instance to the Citrix control plane, deploy and manage virtual desktops and applications within Azure, and still embrace any existing on-premises resources.
Responsibility Changes
We need to capture the management responsibilities of each party as we plan migrations. When running the Citrix Virtual Apps and Desktops service, Citrix is responsible for all components within the cloud control plane, including updates, reducing management responsibilities, and allowing operation teams to focus more on strategic imperatives.
See Citrix Virtual Apps and Desktops service
Architecture
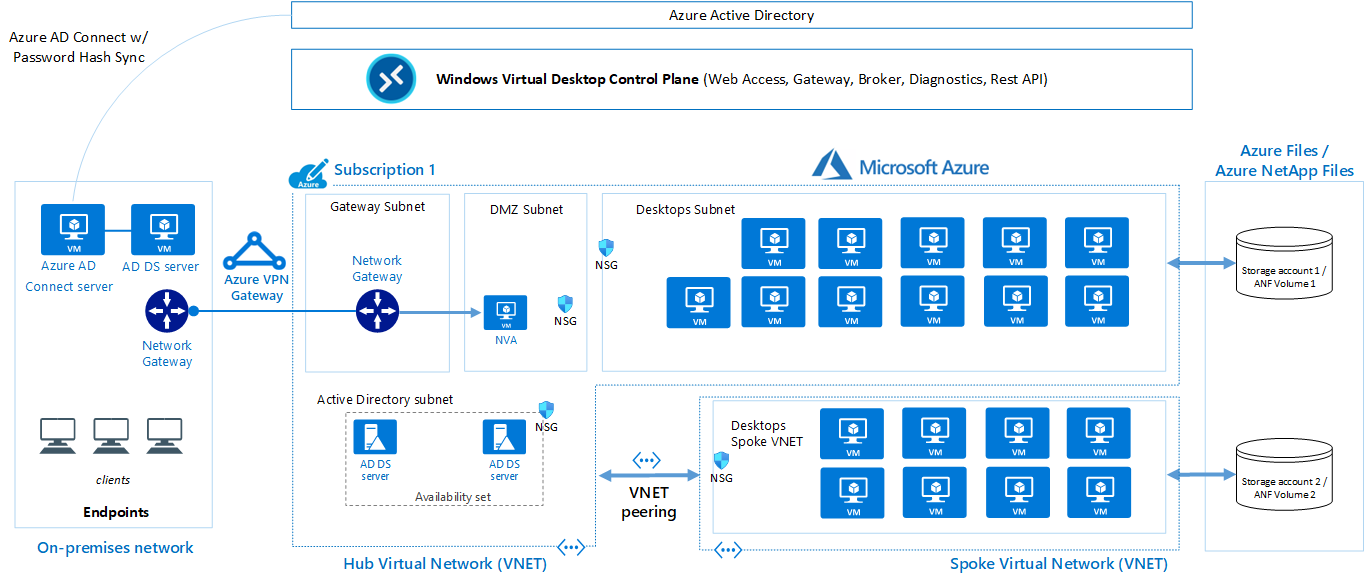
Our architecture foundation is based upon Microsoft providing the underlining infrastructure, including compute, storage, and network, within Azure.
Citrix Cloud adds a management layer (Citrix control plane) to Microsoft Azure. You must note that Citrix is responsible for core desktop virtualization management, including the broker, gateway, management, diagnostics, load balancing, and client. Like a native Azure Virtual Desktop deployment, a person/org is responsible for the desktop and remote apps, and management and policies.
The Citrix control plane enables the central management and orchestration of virtual desktops and apps in Microsoft Azure.

License Requirements
Depending on the OS selected, appropriate licenses for users connecting to the desktops and applications are also required. Ensure all users who are allowed access to these resources within the Citrix Virtual Apps and Desktops service have the required license.
- Windows Server 2012 R2, 2016, 2019:
- RDS Client Access License (CAL) with Software Assurance
- Windows 7 Enterprise:
- Microsoft 365 E3, E5, A3, A5, F3
- Business Premium Windows E3, E5, A3, A5
- Windows 10 Enterprise multi-session or Windows 10 Enterprise:
- Microsoft 365 E3, E5, A3, A5, F3
- Business Premium Windows E3, E5, A3, A5
Assessment
As part of any migration journey to Azure, we must assess the on-premises workloads to measure cloud readiness, identify risks, and estimate costs and complexity.
We decide whether to run an assessment using sizing criteria based on server configuration data/metadata that's collected as-is on-premises, or on dynamic performance data.
- Decide which assessment to run:
- As-is on-premises: Assess based on server configuration data/metadata.
- Performance-based: Assess based on collected dynamic performance data.
- Analyze and Review Assessment:
- Azure readiness steps: Whether VMs are suitable for migration to Azure.
- Monthly cost estimation steps: The estimated monthly compute and storage costs for running the VMs in Azure.
- Monthly storage cost estimation steps: Estimated costs for disk storage after migration.
Steps To Run Assessment:
- On the Get started page > Servers, databases and web apps, select Assess and migrate servers.
- In Azure Migrate: Discovery and assessment, select Assess > Azure VM.
- In Assess servers > Assessment type, select Azure VM.
- In Discovery source:
- If you discovered servers using the appliance, select Servers discovered from Azure Migrate appliance.
- If you discovered servers using an imported CSV file, select Imported servers.
- Select Edit to review the assessment properties.
- In Assessment settings, set the necessary values or retain the default values such as Target and pricing settings.
- Select Save if you make changes.
- In Assess Servers, select Next.
- In Select servers to assess > Assessment name, specify a name for the assessment.
- In Select or create a group, select Create New and specify a group name.
- Select the appliance, and select the VMs you want to add to the group. Then select Next.
- In Review + create assessment, review the assessment details, and select Create Assessment to create the group and run the assessment.
- After the assessment is created, view it in Servers, databases and web apps > Azure Migrate: Discovery and assessment > Assessments.
- Select Export assessment, to download it as an Excel file.
Note
For performance-based assessments, it's recommend to wait at least a day after starting discovery before creating an assessment. This provides time to collect performance data with higher confidence. Ideally, after starting discovery, wait for the performance duration you specify (day/week/month) for a high-confidence rating.
Steps To Review Assessment
- In Servers, databases and web apps > Azure Migrate: Discovery and assessment, select the number next to Assessments.
- In Assessments, select an assessment to open it. As an example (estimations and costs, for example, only)
- Review the assessment summary. You can also edit the assessment properties, or recalculate the assessment.
Steps To Review Readiness
- Select Azure readiness.
- In Azure readiness, review the VM status:
- Ready for Azure: Used when Azure Migrate recommends a VM size and cost estimates, for VMs in the assessment.
- Ready with conditions: Shows issues and suggested remediation.
- Not ready for Azure: Shows issues and suggested remediation.
- Readiness unknown: Used when Azure Migrate can't assess readiness, because of data availability issues.
- Select an Azure readiness status. You can view VM readiness details. You can also drill down to see VM details, including compute, storage, and network settings.
Steps To Review Cost Estimates
The assessment summary shows the estimated compute and storage cost of running VMs in Azure.
- Review the monthly total costs. Costs are aggregated for all VMs in the assessed group.
- Cost estimates are based on the size recommendations for a machine, its disks, and its properties.
- Estimated monthly costs for compute and storage are shown.
- The cost estimation is for running the on-premises VMs on Azure VMs. The estimation doesn't consider PaaS or SaaS costs.
- Review monthly storage costs. The view shows the aggregated storage costs for the assessed group, split over different types of storage disks.
- Drill down to see cost details for specific VMs.
Review Confidence Rating
Azure Migrate assigns a confidence rating to performance-based assessments. Rating is from one star (lowest) to five stars (highest). The confidence rating helps estimate the reliability of size recommendations in the assessment. The rating is based on the availability of data points needed to compute the assessment.
- 81%-100% (5-stars) is a good target to look for
- Confidence ratings aren't assigned if creating an assessment based on a CSV file
Migration Preperation
First part of the migrations, focus on ensuring we have the correct prerequisites and capture the key steps to migrate existing on-premises resources such as VMs to Azure.
Step #1 - Prerequisites
We need to ensure the correct permissions are in place and components deployed in order to work with Azure resources such as storage, networking components, and VMs.
Steps Involved
- Azure subscription is setup and configured with billing
- Ensure domain services, either AD or Azure AD Domain Services, are pre-configured and available
- Ensure domain service is accessible from the Azure subscription and virtual network available for the Citrix Virtual Apps and Desktops service
- Azure AD Connect setup and functioning with on-prem Active Directory
Step #2 - Azure Migrate
Use the dedicated wizard within the Azure portal that allows set up of Azure Migrate for VDI. In this wizard, we set the subscription, resource group, project name, and geography.
Steps Involved
We start the assessment of the current VDI environment by selecting Register. During this step, we create a new Azure Migrate project in the destination Azure subscription. This subscription needs to match the prerequisites outlined in Step 1.
You then select the option to assess and migrate servers, select VDI, and add a tool. After configuring basic parameters, such as the subscription, resource group, and location, make sure you choose Azure Migrate: Server Migration as the migration tool.
The setup wizard also allows us to select optional ecosystem partner tools that provide additional benefits on top of the server migration. You could opt to choose a different provider as the assessment tool on top of Azure Migrate as the migration tool.
After connecting Azure Migrate and optional ecosystem partner tools and accepting any requested permissions, the discovery process starts.
Note: To help migrate from on-premises to Citrix Cloud, you can also use Citrix's Automated Configuration tool for the Citrix Virtual Apps and Desktops service
Step #3 - Discover VMs
During this step, the virtual desktops of the current environment are discovered and assessed. Azure Migrate can assist with moving these workloads to Azure as well.
If deciding not to move some back-end resources, ensure you configure connectivity with on-premises environment using either ExpressRoute or a site-to-site VPN.
Steps Involved
- Collect information about existing infrastructure
- Collect detailed information about current VDI workloads
- Understand current usage, consumption, and application inventories to help determine sizing
Step #4 - Assessment Review
Once adequate amount of data is captured, we can then review the assessment data to determine the best migration path. As you analyze data, you can determine the most cost-effective use of both pooled Virtual Desktop resources and personal Virtual Desktop resources. The information gathered as part of Step 3 is visible in the Azure portal.
Assessment should include information such as the following:
- The personas and amount of users per
- Applications in use by users
- Resource consumption by a user
- Resource utilization averages by user persona
- VDI server performance data
- Concurrent user reports
- Top software packages in use
- Software and license compatibility
Depending on the results analyzed as part of the assessment and depending on whether you want to benefit from Windows 10 multi-session or keep on using Windows Server or Windows 10 Enterprise, you have two options.
Option 1: Create New Image Templates
This is the most common approach which is creating a new template. One of the benefits of doing so is that it can deploy Windows 10 multi-session to make use of all the latest OS features and benefits.
- Windows 10 Enterprise multi-session is available in the Azure Shared Image Gallery.
- Once uploaded to Azure, we need to import custom template into Citrix Virtual Apps and Desktops service, and we need to ensure the Citrix Virtual Delivery Agent (VDA) software is installed.
Option 2: Migrate and Transform
With this option, we can migrate the existing VDI to Azure and transform it into a Citrix Virtual Apps and Desktops service session host server.
This migration, or "lift-and-shift" approach, is suitable for scenarios such as moving on-premises resources from a current state. In such a case, we would use the Discover option in the Azure Migrate: Server Migration tools. This allows us to convert an appliance in its environment, which manages the machines' replication, to Microsoft Azure.
The replication provider is downloaded, installed, and registered to the Azure Migrate project to replicate Azure. As the replication of the hosts into Azure Blob Storage is now started, you can continue to let the replication occur until it's ready to test the VMs and then migrate them into production.
- As machines start running in Azure, we will need to ensure that the Citrix VDA is installed on each VM migrated for use.
- Identify specific requirements for the Citrix Virtual Apps and Desktops service environment with Azure Virtual Desktop.